New Research - Minimalist Shoes Improves Balance and Strength in Kids


latest News

How to Make Huaraches
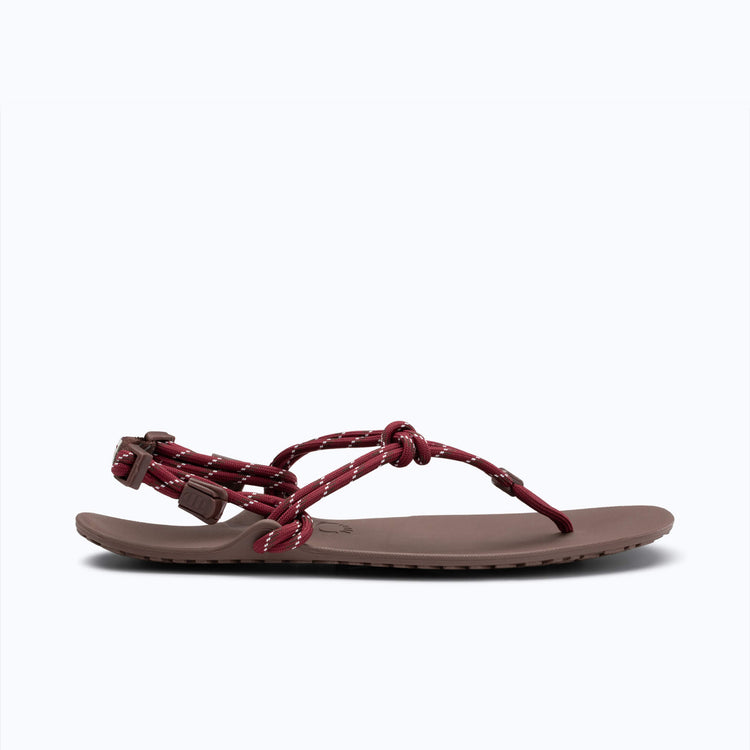
Ever since the publication of Christopher McDougall’s book, Born to Run, there has been an increased interest in the simple sandals worn by the Tarahumara, which he describes in his story. Called “huaraches,” the footwear of the Tarahumara are basic sandals created from the rubber tread of old tires and a bit of leather cord. Not to be confused with the fancy leather sandals that are also called huaraches, the sandals worn by this people group are the original minimalist running sandals. Members of the tribe are known to run incredible distances over rough terrain and gravel roads with nothing on their feet but these huarache sandals. Granted, the Tarahumara are not the first or only people to wear similar sandals. In fact, the oldest archeological find of a shoe is many thousands of years old, was found in Fort Rock, Oregon and looks quite familiar. Now, If you’ve read Born to Run, or otherwise heard about huarache sandals, maybe you’ve been itching to get your hands on a pair of your own minimalist running sandals. There are two ways you can do so. For the less adventuresome, Xero Shoes has created barefoot sandals that recreate the minimalist experience of the original huarache sandals. Find yours here. For those who are up for the fun of taking on a fun do-it-yourself project, you can make your own sandals. These instructions will give you the details you need to create your own DIY huarache sandals from scratch using our Xero Shoes Classic Kit with Vibram rubber. Or you can make some sandals with the only outsole made specifically for barefoot running sandals (yes, you can wear them for other activities than running) – either the 4mm Connect or 6mm Contact kit with FeelTrue™ rubber outsoles. Click here for instructions. (Find out more about our FeelTrue™ products here.) And, at the end of the instructions about making huaraches, you’ll learn one way to tie huaraches. If you’re adventurous and creative, you can find other tying styles here. You can also download a PDF of the instructions, below, by clicking here. Things you’ll need to make huaraches: Some sort of sole material. Again, we made our FeelTrue rubber to be the best combination of strength, flexibility, and barefoot feel for DIY huaraches sole material. Another good option is the material in our Classic kit, the 4mm Vibram Cherry. Something to lace the sole to your feet — about 60-72″ per lace (depending on your size). You can use leather lace, hemp cord, etc. We use 5/32″ polyester cord… it’s soft, durable, colorful and provides the right amount of support (too thin can hurt, too thick gets unwieldy). Piece of paper and a marker (like a Sharpie) — to trace your foot. Pencil — to transfer your foot template to the sole material. Strong scissors — to cut your tracing and the sole material. Leather punch — to make the lacing holes in the sole (NOTE: We do not recommend using a nail or knife to make the hole. Holes made that way tend to tear). You want the holes to be the same size, or slightly smaller, than your cord. We use a 1/8″ punch for our 5/32″ cord (the hole is 1/32″ smaller that the cord). We use this Lace Hole Punch. Note: Depending on the material you use, you could try drilling a hole (some Xero Shoes customers have done this with the Vibram Cherry sole). Lighter or match — to seal the ends of the lace, if you’re using polyester, nylon, other woven synthetic lace material. Step-by-step instructions for making Huaraches: Step 1 – Trace your foot Step on a piece of paper. Lean forward and put a bit of pressure on your foot so it flattens a tiny bit. Then, using a marker (like a Sharpie) held vertically, trace around your foot. You don’t need to get every tiny nook and cranny, and you’re not trying to get an EXACT measurement of the sole of your foot… in fact, by holding the pen vertically, you’re making a trace that’s slightly bigger than your foot, and that’s exactly what you want. Step 2 – Even out the tracing You want to smooth out the curves. For example, you want to make the toe area into a curve, rather than bumps for each toe. Also, I extend the area on the inside of the big toe and the ball of the foot a little bit (sometimes when you run, your foot slips to the inside, so you want to add a bit of extra space here). Step 3 – Cut out the tracing Cut around the tracing. That is, cut on the outside of the line you’ve drawn, rather than ON the line. Again, that little extra bit can help make sure the finished product is comfy. Plus, you can always remove material from your huarache sandals and make them smaller, but you can’t make them bigger, so err on the side of too big. Step 4 – Check your other foot Take your cut out tracing, flip it over, and step on it with your other foot. If your other foot fits in the cutout, then you’ll use just this one template. If your other foot is significantly different (especially if it’s bigger), repeat steps 1-3 on your other foot. The beauty of making your own huarache sandals is that you can make them to fit your unique feet. How to make Xero Shoes Barefoot Sandals Step 5 – Transfer the pattern to the sole material Place the cutout pattern(s) onto your sole material and trace around it/them with a pencil. If you only have one cutout pattern, remember to flip it over otherwise you’ll end up making 2 soles for the same foot! Step 6 – Cut out the soles If you’re using the 4mm Vibram material that comes with the Xero Shoes DIY huarache kit, you can use strong scissors for this. You’ll have to make small cuts towards the back of the scissors and work your way around the material. Step 7 – Mark the toe hole Step on your soles and, using a marker (I use the Sharpie from Step 1), put a dot between your first and second toe, right where the webbing between your toes is, and slightly closer to the second toe than right in the middle of the space between the toes. The reason for this is, when you wear your sandals running, your foot will want to shift toward the inside. By putting the hole closer to the second toe, your foot stays in place better. NOTE: It’s much easier to have someone else make this and the next 2 marks while you just stand on the soles. Step 8 – Mark the inside ankle hole Still standing on the sole, place the pen vertically, just in front of your ankle bone, and make a mark on the sole at that point. Step 9 – Mark the outside ankle hole Still standing on the sole, you’ll notice that there’s a place where your foot makes less contact with the ground. Make a mark on the outside edge of the sole at that point. At this point, you should have marks for three holes. Step 10 – Punch the holes The size of the hole you make depends on the material you use for the laces. For example, when I use 3/16″ polypropelene/nylon for the laces, I make a 1/8″ hole. You’ll want to use a leather punch (I use either a rotary leather punch or the Lace Hole Punch we provide with Xero Shoes). NOTE: I do not recommend using a nail or knife to make the holes. Doing so can often leave a hole that’s not clean, leading to tearing the sole. Punch out the toe hole exactly on the mark you made. For the two ankle holes, punch a hole about 1/4″ in from the edge, in line with the marks you made in steps 8 and 9. Step 11 – Prepare the laces Depending on your lace material, you may need to prepare the ends in order to get them through the holes. For example, if you’re using leather, you may want to cut the ends of lace into a point. If you’re using polypropelene/nylon, heat the ends with a flame and carefully (so you don’t burn yourself) seal and shape the ends to be as pointy as possible. Step 12 – Thread the lace through the toe hole and secure it Push one end of the lace through the toe hole, from the top to the bottom. A traditional option is to make a knot in the lace, on the bottom side. I typically use a “Figure 8 knot”, pictured here. If you’re using polypropelene/nylon or polyester lace, you’ll want to run the flame from a lighter (or match) under the knot, to melt the nylon slightly, then press the knot together to seal it and flatten it a a bit. Lately, though, I’ve replaced the knot with a lower profile “Lace Bead.” Click this picture to see a video of Steps 5-13 How to make Xero Shoes Barefoot Sandals How to make Xero Shoes Barefoot Sandals Step 13 – Thread the ankle holes Pass the lace through the outside ankle hole first, from top to bottom. Then pass the lace through the inside ankle hole, also from top to bottom. Follow the pictures to get it correct… you want the lace to “lock in” around the holes. Click this picture to see a video of how to tie huaraches How to make Xero Shoes Barefoot Sandals Step 14 – Put your foot in and tie the huaraches There are 2 common ways to tie huaraches running sandals. One is the more traditional “toga-style.” And the other (which I learned from “kicksock” on the Google Barefoot Running group) is more stylish and allows you to slip the huarache on and off without retying. There’s no easy way to describe the tying methods, so follow the pictures/videos. Oh, and you may want to check out these new cool, decorative, and stylish ideas about how to tie huaraches and what to do with “leftover lace.” The “slip-on” method from a 1st person view: How to make Xero Shoes Barefoot Sandals Step 15 – Go out and ENJOY your new huaraches! Remember, though, to take it easy at first. If you’re not used to going barefoot, especially running barefoot, you’ll be putting more stress on your muscles and skin than you’re used to. Work your way into your huaraches slowly. And if you come up with cool, new tying ideas, put them on our Tying Page. Quick Questions and Answers I have found I often get a couple of questions when I’m talking about DIY huarache sandals. Maybe they’re your questions, too. Can you really run in huaraches? I get it. We’re used to running in shoes with thick soles and lots of padding. But yes, you can absolutely run in huaraches and I do all the time as do many tens of thousands of Xero Shoes customers. Remember, these aren’t flip flops. Unlike a casual sandal, huaraches fit snugly and securely to your feet. It is important to realize, however, that you are going to need to learn to run differently. One of the things Christopher McDougal talks about in his book (which I mentioned at the beginning of this post) is the relationship between footwear and running style. If you want to know more, I have written a post that tells you everything you need to know about how to run barefoot or in minimalist shoes like huaraches. I like the idea of minimalist footwear. Is there something with a bit more to protect my foot? After making your own DIY minimalist sandals, you may wonder if there are more minimalist shoe options out there. Absolutely. Huraches are associated with the barefoot style of walking or running that emphasizes minimal footwear that allows your feet to move and function naturally. Barefoot sandals, of which huaraches are an example, are just one type of footwear available. You can also wear barefoot shoes or even a pair of barefoot boots. Xero Shoes has models designed for running as well as walking & hiking. They are perfect for wet or cold weather or any time you just want a bit more coverage or protection.
Minimalist and Barefoot Shoes - a scientific overview
When I talk about natural movement and the footwear that does, or doesn't, support it, I'm often asked "Where's your proof?" In fact, if you look at the comments on many of the videos I've made that show how padded, stiff, thick, motion-control, elevated heel shoes with pointy toe boxes don't allow the foot to move naturally, you'll hear from people who agree that each of those characteristics can be bad. I've even had employees of "Big Shoe" companies concede that their products don't allow the foot to move the way, well, feet are meant to move. But then when I show how the design of a truly minimalist shoe, like Xero Shoes, can allow for natural movement which can be beneficial, some of those same people think I'm merely spouting an opinion and not synopsizing a LOT of research. So, if you're one of those people who wants "the proof," I can't think of a better starting point than this paper, published by the American College of Sports Medicine: Stepping Back to Minimal Footwear_Applications Across the Lifespan (clicking the link opens the paper in a new tab). Read the paper, of course, but if you want to have fun, look at the notes so you can see the amount of research that backs up the paper. And if you want to have REAL fun, search for and read the papers listed in the notes. I often call some of that research "The Dumbest Science Ever Done." I'm being deliberately tongue-in-cheek when I use that phrase, but I use it to get people to think about why those of us who promote natural movement need to do serious scientific research to demonstrate something as obvious as "use it or lose it." We all know that if you DON'T USE your muscles, ligaments, and tendons, you LOSE strength, flexibility, function. And, equally, we all know that the way you build strength, flexibility, balance, mobility, and agility is by USING your body. Anyway, enjoy the paper, and leave your thoughts about it in the comments, below...

Barefoot Shoes for Weightlifting & Strength Training
Think about the last time you went to the gym. You probably planned your outfit. But when was the last time you thought about your shoes? Unless you're a competitive lifter, chances are you just grabbed whatever sneakers you had — the same pair you run in, walk the dog, even run errands. And if that’s the case? You might be leaving strength gains on the floor. Why Do Some Weightlifters Workout Barefoot? When you deadlift, swing a kettlebell, or press a barbell overhead, what’s the first thing you feel your body do? Your feet push down into the ground. That downward force is your foundation. And if your foundation is unstable, your lift is compromised. To create real stability, your feet need three things: A wide base (toes able to spread naturally) Ground feedback (so your brain knows what your feet are doing) Active muscular control (which begins with that sensory feedback) Think about walking on stilts. Or walking with two pillows strapped to your feet. It’s awkward, right? The higher and softer the platform, the less stable you feel. That’s what happens with thick, cushioned shoes. Foam compresses and traditional shoes that have added cushion in the heels (added heel drop) shift your weight forward. Narrow toe boxes squeeze your base. And the padding absorbs force you’re trying to send into the ground. If strength begins with the feet — and many lifters swear it does — then unstable footwear could hamper your potential. The Benefits of Working Out Barefoot Training barefoot gives you: Better balance and stability. Direct ground contact creates a solid base compared to shoes, where cushioning and heel padding can mess with your weight distribution. Improved proprioception. That’s your body’s ability to sense position and movement. When your feet feel the floor, your brain can fine-tune balance and coordination. Better form. When lifting barefoot, your feet and toes can better grip the ground and maintain balance, which translates into better technique. Natural force transfer. Instead of force being absorbed by thick cushioning, it goes directly into the ground — and back up through your body. But most gyms won’t let you lift barefoot. Going fully barefoot isn’t always practical (or sanitary). That’s where barefoot training shoes come in. Barefoot Shoes for Weightlifting If you want the benefits of barefoot training with protection, a barefoot, zero-drop shoe is your best bet. Zero drop means your heel and forefoot sit level with each other. No artificial forward tilt. No raised heel throwing off your posture. Here’s why that matters: You stay closer to the ground. Your weight stays balanced. Your mechanics stay natural. Xero Shoes are designed with: A thin, flexible sole for real ground feel A wide toe box so your toes can spread for stability Lightweight construction so your shoes don’t become ankle weights Research even shows that simply walking in minimalist footwear strengthens foot muscles as effectively as dedicated foot exercise programs. Imagine what lifting in them can do. Strong feet = stronger foundation. Stronger foundation = stronger lifts. Tips For Transitioning To Barefoot Exercise If you’ve been wearing thick, cushioned shoes for years, your feet have likely been underworked. Don’t rush the transition. Start Slow If you’ve never worn minimalist shoes before, you’ll want to introduce them the way you would any new exercise or gear—slowly. Build Foot Strength You need to wake up your foot muscles, so start with easy foot balances and strength exercises. A 2019 study by Dr. Sarah Ridge found that walking in minimalist shoes strengthens the muscles in your feet as much as following a foot strengthening exercise program. Increase Gradually As your feet and muscles get stronger, slowly increase the duration and intensity of your workouts. Add just one new exercise or movement at a time to avoid overexertion. Listen to Your Body Some muscle soreness is normal. Rest when needed. Don't push yourself too hard too quickly or ignore any discomfort. The content of this post does not constitute and is not intended to be a substitute for professional medical advice, diagnosis or treatment. Always seek the advice of a physician or other qualified health provider with any questions or concerns you may have about your health or a medical condition.
Yes, You Can Wear Barefoot Shoes with Flat Feet or High Arches. Here’s Why
Not infrequently, when someone takes a look at my barefoot shoes, they will say: “I wish I could wear barefoot shoes, but I can’t do that. I need support.” “Oh?” I’ll respond. “Why do you need support?” Then something happens that I love. I get one of two seemingly contradictory answers. Either: “I have flat feet!” “I have high arches!” They usually add to their proclamation some form of external validation, like, “I’ve seen one of the best podiatrists in the world and he agrees that I need orthotics.” Oh? Your podiatrist agrees that you need to give him or her an additional $300-1,000? What a shock. Contrary to what many people believe, high arches and flat feet are not necessarily a problem. To understand why not, you first need to know a little bit about arches and what can go wrong with them. Then we’ll talk about what the problem really is and why there is usually a better solution than orthotics. Finally, even if you are going to wear orthotics, barefoot-inspired shoes are a great choice. Keep reading to find out why. A Quick Look at the Anatomy of Your Feet Why do our feet have arches, anyway? If you look carefully at an average foot, you’ll actually see it has 3 arch shapes in both directions – from front to back and side to side. When people talk about high or low arches, they’re referring to the medial longitudinal arch. It’s the one that runs lengthwise on the inside of each foot. This flexible arch does two important things. When allowed to function naturally, it can easily handle the impact forces generated each time your foot lands on the ground. Second, it acts as a spring, which helps to absorb energy on impact and return some of it when you lift your foot again. Why Do Flat Feet or High Arches Matter? Frankly, they don’t for the vast majority of people. In fact, a study found that arch height made no difference in pain or function of the foot. Many people who have a low or high arch will never really notice it. Obviously, if something is wrong with your arches, there is the potential that they won’t adequately perform those two functions of handling impact and providing spring-like rebound. For a very small number of people, very low or high arches can interfere with the function of the foot. If you’re in this group, you’re probably already well aware of it. For most people, again, arches that are higher or lower than average aren’t a problem. We all fall along a continuum of arch height and the shape of our particular feet is mostly a matter of genetics. The Real Problem and What to Do About It But maybe you have noticed something about your arches – high or low – and wondered if there is anything you should do. Most people have heard that they need some support, ranging from specially-designed running shoes to custom-made orthotics. All of these options are expensive; do they provide any benefit? The evidence suggests they do not. One study, for instance, looked at groups of children with flat feet for a few weeks and found that adding orthotics made no statistically significant difference. Here’s the really interesting part. We do have research that flat feet can be improved by exercising the muscles of the foot. (The linked study, by the way, also found that orthotics didn’t help.) To me, this makes perfect sense. Our feet are a complex combination of muscles, tendons, bones, and ligaments. Strengthening the muscles helps everything to function the way it should. I’m not a scientist or a podiatrist. But when I look at the research, it seems like the problem for many cases of flat feet isn’t that the foot needs support. That is, the “cure” for the problem is not putting your foot in a cast (which is essentially what an orthotic is), It’s making it stronger by using it in the same way that your bicep gets stronger when you do bicep curls. Science writer Gina Kolata reports the conclusion reached by Dr. Benno M. Nigg, a scientist who studies orthotics: “The idea that [orthotics] are supposed to correct mechanical-alignment problems does not hold up.” Are Barefoot Shoes Good for Flat Feet? Yes, barefoot shoes are good for people with flat feet, allowing feet to move more naturally and strengthen muscles in your feet for improved support. This is good news for those interested in barefoot-inspired (or “minimalist”) shoes, or even trying barefoot running. Why? One benefit of walking or running naturally, the way our ancestors did, with a bit of protection (like you get from barefoot shoes), or even in bare feet, is that you engage the muscles of your foot in a way you don’t in “traditional” shoes. That’s because “normal” shoes have thick soles with lots of support and cushioning that limits the movements of your feet. Stiff arch support inserts limit motion even further. What happens to muscles that don’t move? They get weaker, as a study of the effects of orthotics on foot muscles demonstrated. The idea that going barefoot or wearing barefoot shoes helps develop foot strength isn’t speculation. A study by Dr. Sarah Ridge in 2019 found that merely walking in minimalist shoes strengthens foot muscles as much as doing a foot strengthening exercise program. (By the way, Dr. Ridge says you should get the same benefits wearing Xero Shoes as the shoes used in that study.) Another study confirmed muscle gains with minimalist shoes and also noted increased arch stiffness. In case some of these terms are new to you: barefoot or minimalist shoes are designed to let your feet move as naturally as possible. Unlike a “traditional” shoe, they have thin soles that are flexible and let you safely feel the ground. They also have “zero drop” — that is, they don’t slope downhill from heel to toe. Finally, a barefoot shoe will have a roomy, foot-shaped toe box to give your toes plenty of room to move. I need to say it again: I’m not giving you medical advice and you should consult with your doctor about any problems you’re experiencing with your arches, preferably one who understands the research and the value of natural movement. But I am encouraging you to at least consider the possibility that you can enjoy the freedom and fun of wearing barefoot shoes if you have flat feet — even if you’ve assumed you would always need “comfortable” and “supportive” traditional shoes. The Best Running Shoes for Orthotics? But let me just add one more thing. Suppose you are someone who uses orthotics and plans to continue to do so. I think you are still best off choosing barefoot shoes. Why? Look inside all the shoes you have now and note what you see. Each pair will have a different shape; some with more arch support, some with less; some with more slope from front to back, some with less, etc. Your orthotics are designed to fit your foot while resting upon a level base, but the inside of most shoes is anything but level. What this means is that every pair of shoes you wear will fit differently, and probably none of them provides a level platform on which your orthotics can rest. Moreover, as the foam midsole in those shoes breaks down (which it starts doing the moment you begin wearing them), the geometry of the shoe and orthotics will change which could cause structural problems in your feet and legs. Barefoot shoes have a flat, zero-drop sole that provides the perfect base for your orthotics and no foam midsole that wears out. So with or without orthotics, barefoot running shoes are a great choice. My own story Personally, I had flat feet my whole life. If I stepped out of a pool, my footprint looked like an oval. After a few months of running and walking barefoot, I noticed I started developing arches! I ruined all the family jokes about the flippers I had at the end of my legs. Now, I get out of the water, step on the ground, and you see the outline of a FOOT. Granted, I don’t have drive-a-bus-under-them arches but, again, that’s genes. All I know is that I haven’t used my expensive shoe inserts since 2009 and my feet haven’t had a problem in all that time. Ready to try your own pair of barefoot shoes? Take this quiz to find your perfect pair here. The content of this post does not constitute and is not intended to be a substitute for professional medical advice, diagnosis or treatment. Always seek the advice of a physician or other qualified health provider with any questions or concerns you may have about your health or a medical condition.
Are Barefoot Shoes Good for Plantar Fasciitis?
It is estimated that around 10% of the population suffers from heel pain caused by plantar fasciitis. Interestingly, though the condition is quite common, we don’t know as much as you might expect about what causes it and how to treat it. I often hear from runners who have switched to barefoot-style running that they have experienced freedom from the plantar fasciitis that used to bother them. In this article, I’d like to share a bit about some research that points to a reason why this may be happening. If you suffer from plantar fasciitis, you may find this opens up some new directions to explore as you seek optimal foot health. I’ll start off with some important background about what plantar fasciitis is, what seems to cause it, and how it’s often misdiagnosed. Then we’ll look at some research that points to an interesting new approach to helping people find relief. What is plantar fasciitis? On the bottom of your foot, there is a thick band of tissue, called the plantar fascia, that connects the front of the foot with the heel bone. The plantar fascia helps to support the arch of the foot and absorbs shock when our feet hit the ground. The plantar fascia can become inflamed and cause stabbing pain in the heel. Typically, symptoms are at their worst upon waking in the morning and improve once you get up and move around. What causes plantar fasciitis? Many people believe that plantar fasciitis is caused by repetitive stress. Stresses to the plantar fascia can cause small tears and these, in turn, can lead to inflammation and heel pain. What causes this kind of stress? In the literature, certain risk factors are associated with a greater likelihood that a person will experience plantar fasciitis, like doing lots of running, having a higher weight, or being in an occupation that keeps you on your feet all day. This seems to make sense. If plantar fasciitis results from repetitive stresses to your plantar fascia, those factors sound like ways of ramping up the demands placed upon your feet. But what if it’s not repetitive activities, or weight, that’s the real cause of the problem? For example, what if running form is the issue? Some ways of running place a lot more stress on your feet than others. So, the standard description of the cause of plantar fasciitis encourages us to think in terms of a simplistic picture: that repetitive stress is the input and plantar fasciitis is the output. And yet you’re about to discover that there is an important mediating factor that has a lot to do with the stresses we’ll actually experience, whatever our activity level, and how those will impact our feet. Is it really plantar fasciitis? But first, plantar fasciitis can be easily misdiagnosed. Sometimes the symptoms of PF can be caused by overly-tight calf muscles which pull on the plantar fascia. Here’s how to check: try using a foam roller and/or deeply massage on your calf muscles and see if the symptoms improve. If they do, you know that you should pay attention to releasing that calf tension. What is the best treatment for plantar fasciitis? This is where things get interesting. There is a common protocol for treating plantar fasciitis. It involves rest (to give your feet a break from whatever is thought to cause the repetitive stress damage in the first place), stretching, and the use of ice and NSAIDs (think ibuprofen) for pain. The essence here is to treat the foot pain associated with plantar fasciitis by giving the feet a rest. Recently, some researchers are proposing a different tack. Patrick McKeon and colleagues, for example, suggest that perhaps what the foot needs most isn’t rest but exercise. This isn’t to say an acute inflammation of the plantar fascia might not need time for recovery, but they argue that the core strength of the foot is the key factor that determines how likely we are to experience injuries like plantar fasciitis in the first place. In other words, greater foot strength is the key to greater foot health, both when it comes to plantar fasciitis as well as with other repetitive stress injuries, including those typically associated with running. A clinical trial backs this hypothesis up. It found that strength training exercises for the foot and ankle resulted in better outcomes than stretching alone for those suffering from plantar fasciitis. Barefoot shoes and plantar fasciitis So what does this research have to do with barefoot shoes? Barefoot shoes (sometimes also called minimalist shoes) are designed to let your feet move as naturally as possible, as they would when walking barefoot. Barefoot shoes have zero heel-to-toe drop (also called “zero drop”), meaning the heel and forefront are level and the sole of the shoe is completely flat. In comparison, typical running shoes come with things like arch supports, thick padding, and elevated heels. Wearing “supportive” shoes keeps your feet from moving the way they ordinarily would. And guess what? Immobilizing your feet, which happens with arch support and stiff shoes, can make your feet weaker. Research by Katrina Protopapas showed that adding arch support in the shoes of healthy people reduced their foot muscle size and strength by as much as 17% in just 12 weeks. Conversely, when your feet are allowed to move, they can get stronger. Research by Dr. Sarah Ridge and others have shown that walking in minimalist shoes indeed strengthens the foot as much as doing a foot exercise program (And, by the way, she says Xero Shoes should give you the same benefits as the shoes used in her study.) So we can put these two ideas together: one group of researchers says strengthening the core foot muscles will help avoid injuries like plantar fasciitis. Another says walking barefoot (or in minimalist shoes) is effective in strengthening the muscles of the foot. What’s the conclusion? It looks like the evidence suggests barefoot shoes (or walking in bare feet) could be helpful for avoiding plantar fasciitis pain. Here I want to point you to just one more piece of research. It reports on a case where barefoot running was successfully used to treat plantar fasciitis in a female athlete. I know; it’s just one case. There is more research needed to confirm barefoot running (or walking) as a way to prevent or treat plantar fasciitis. But the evidence so far is encouraging. If you have ever developed plantar fasciitis, it is certainly worth looking into. If you’d like to try out wearing shoes that are designed to let your feet and toes move naturally, find your pair of Xero Shoes right here. The content of this post does not constitute and is not intended to be a substitute for professional medical advice, diagnosis or treatment. Always seek the advice of a physician or other qualified medical professional with any questions or concerns you may have about your health or a medical condition. Common questions you may be wondering about going barefoot I’ve been talking with people about going barefoot for a long time. I know there are a couple of common questions that come up. Just in case, I’m giving some brief answers here (and a pointer to where you can find more information). Are barefoot shoes really the same as going barefoot? Obviously, they aren’t exactly the same. When you wear shoes, you have a layer between you and the ground. You do lose something here; we all know that irreplaceable feeling when we kick off our shoes and feel our bare feet on the green grass. But there are downsides to bare feet. They don’t offer you much protection on rough or sharp surfaces and they don’t do much for you in the cold. Barefoot shoes are designed to get you as close to the barefoot experience while still providing protection to the foot. If you want barefoot running shoes (or any kind of barefoot shoes), just keep in mind what you should be looking for. Dr. Irene Davis defines barefoot, or minimalist shoes with these characteristics: They’ll have a wide toe box to give your toes plenty of room to move, splay, and breathe. They are zero drop, meaning they won’t have an elevated heel which can negatively impact posture. Barefoot shoes do not have unneeded cushioning. (Research from Dr. Christine Pollard shows, much to her surprise, that cushioning does not actually reduce impact forces.) Barefoot shoes won’t have unnecessary arch support. (Research from Katrina Protopapas shows that adding arch support to the shoes of healthy athletes reduced foot strength and muscle mass by as much as 17% in just 12 weeks.) They will have a thin sole that allows both flexibility and ground feel. The end result is that your feet will be moving as you walk and run, using and therefore can strengthen the muscles of your feet. If I’m interested in starting to walk barefoot or in barefoot-style shoes, how should I get started? The short answer is that you begin slowly and listen to your body. If you’re willing to listen, the feedback you’ll get from your feet will teach you how to walk in a natural, pain-free way. Think of it like going to the gym after a long break – you don’t do 8 hours of bench presses. You do one set, see how you feel the next day, and as your body tells you it can handle the load you add reps, or weight, or, eventually, sets. Use that same attitude and strategy when switching to minimalist shoes. If you want to maximize your chances of beginning well, you’ll want to have a look at our post on how to walk barefoot.
4 Exercises to Strengthen Your Feet (And Ankles)
This article was updated on April 10, 2023 I’ve always been a fan of shoes as a fashion statement. However, when looking cool or sexy becomes the priority over feeling good, we have a problem. It is no secret nowadays that the health of our body directly affects how we think and feel. The last 10 years of my life have been dedicated to helping others feel good in their body and mind. When it comes to feeling good, I always start with the feet. Why Are Foot Strengthening Exercises Important? Many of us know how to stretch and strengthen our abs, chest, shoulders, thighs, and buttocks. But what about the feet and ankles? Feet are the foundation of our posture, but they are often ignored at the gym. You can improve your overall well-being by practicing a few main joint movements of the ankles and toes. Further down I will go over a few daily exercises to improve your health from the ground up. Your Feet Affect Everything When I teach yoga – especially my hip-focused workshops, I spend 20% of the time on the feet and ankles. The health of your feet directly affects all of the muscles and joints above, including the hips, knees, and lower back. “Supportive” Shoes Are Only A Quick Fix I always find it comical that modern medicine provides these solutions for your foot problems: Shove a sole into your shoe to lift your arches for you Find shoes that articulate your ankles for you while you walk Don’t get me wrong, there is a time and place for these quick solutions. However, they are not a long-term solution that will make your feet stronger. Here is an analogy of what short-term solutions do to your body. Pretend that your body is a lazy employee at work, and your doctor is the manager. The manager can either: Teach us how to be productive and inspire us to take action Simply do the work for us and teach us nothing Firing the employee is not an option – you only have one body, after all! The best option, of course, is the one that is better for us in the long term. However, most of us don’t actually take the time to support our overall well-being. If you’re reading this, you probably aren’t a “lazy” human being. You are looking for solutions and answers, and you are willing to do the work. This is why you have chosen to wear barefoot shoes from Xero Shoes, isn’t it? You want to take care of your long-term foot health! So, let’s get into building strength. How Can I Make My Foot Muscles Stronger? In order to get stronger feet, let’s take a look at the four main actions of the ankle. Dorsiflexion Dorsiflexion is what we commonly refer to as flexing the feet. Stand on two feet and bend your knees, lean forward till your knees move forward. You’ll see the skin at the front of your ankle wrinkles, this action is called dorsiflexion of the ankle joint. Plantarflexion Plantarflexion is the exact opposite of dorsiflexion, and it is commonly known as pointing your foot as a ballet dancer would. Inversion Sit down with your legs out in front and turn the soles of your feet toward each other like you are making “prayer” feet. This is called inversion or inverting your ankle. Note, you may sit up on blankets or a couple of pillows if your hamstrings are on the tighter side. Eversion This is the opposite of inversion and is usually the most challenging. Stand up again, press the big toes down, and pull the outside edges of your feet up. You will see wrinkles form in the outer ankle, and you will feel the muscles along your outer shin engage. What Feet Strengthening Exercises Work? The following foot strength exercises will help to strengthen your muscles so you can perform the actions above: https://youtu.be/lPb3ZY13oY8?feature=shared 1. Seated Plantar flexion Sit down with your legs in front. Plantar flex and relax your ankles repeatedly with straight knees. You are trying to activate your calf muscles. Keep your feet everted by squeezing the inner ankles together. If you need to, you can use a yoga strap to help with the range of motion. Try without the strap as well to build up your foot strength. 2. Seated Dorsiflexion This action is the opposite of the first exercise. Sit down with your legs in front and pull the tops of your feet back. Release and repeat three times or more until you feel the heat building in the top of the shins. These muscles are your tibialis anterior muscles. 3. Calf Raises Stand upright with your feet flat on the floor. Plantar Flex your ankles until your heels lift. Try not to let your ankles roll outward during these. The target muscles here are called the gastrocnemius and soleus muscles. To keep the ankles from rolling forward, you’ll be using the muscles of the outer shins. 4. Inversion and Eversion Practice the inversion and eversion techniques described above. These exercises are the ABCs for your feet and ankles. Do them daily before getting out of bed to wake up all the muscles in your foot and ankle. Bonus: The Toes Take your foot exercises up a notch by spreading your toes. Also known as abduction, and you can do this either with a toe spreader or using your fingers to separate the toes. With time and repetition, you will be able to use your muscles to spread your toes. Until next time, Matt Giordano, aka @TheYogiMatt The information in this post does not take the place of medical advice. Only your doctor can provide advice, diagnosis, and treatment. Talk to your doctor or physical therapist if you have questions about your health.

5 Essentials to Pack for Your Next Adventure Travel Trip
There’s travel. And then there’s adventure travel. Adventure travel means different things to different people. It can mean a long backpacking trip through the Peruvian Andes. It can mean spending a month riding the longest rail line in the world. It can mean scrambling up a mountain side. Whether you’re bagging peaks, tackling every zip line a country has to offer, or hut-to-hut hiking in the Swiss Alps, one thing is certain... Packing space is at a premium, and if you’re carrying your belongings on your back, so is weight. Packing Light – Tips from a Career Digital Nomad Nora Dunn (aka The Professional Hobo), has traveled full-time for 12 years, two of which she traveled just with carry-on luggage. Which is to say, Nora knows a thing or two about packing light... and about how to pack for maximum comfort in a minimal amount of space. When it comes to what goes with you on an adventure travel trip, Nora’s favorite word is packable. Think about the bulky items you would typically take on a trip. Is there a packable alternative? Some things are essential no matter where you’re going and what you plan to do when you get there. If you can find a space-saving, lightweight version of those essentials that are tough, durable, and versatile, you’ve got a winner for your next adventure outing. Nora’s Five Essentials for More Rewarding Adventure Travel Experiences When asked about the things she couldn’t do without on an adventure trip, Nora had five must-haves that she recommends for any traveler, but especially for adventure travelers. 1. A Pair of Packable Shoes Shoes are one of the bulkiest, heaviest items you pack for any typical trip. A traditional pair of shoes is going to be rigid and take up a lot of space in your luggage. They’re also going to add a lot of weight. A packable pair of shoes is a game-changer. What makes a pair of shoes packable? They have thin, flexible soles and a soft upper. They fold in half easily or roll up to take up almost no space. And they weigh next to nothing. When Nora discovered barefoot-inspired footwear, it forever altered how she approaches choosing shoes for a trip. Her go-to for adventure travel is a pair of barefoot trail runners like the Mesa Trail II. She says, “I love trail runners... they completely revolutionized how I hike but then also how I travel. “For fifteen years I’ve been using trail runners and I love them for their versatility. They can do everything. They can take you on those outdoor adventures. But they can also be light and rolled up so they pack easily. You can wear them around town. They can double as a casual shoe.” Nora also mentions Xero Shoes Prio as one of her favorite shoes: “The Prio is an amazing shoe. You probably shouldn’t take it up a mountain, but I literally have worn them going up a mountain.” The Prio is versatile in terms of looks. It’s right at home in the great outdoors paired with shorts and a lightweight jacket. But it can transition to walking around museums, visiting local markets, or touring remote villages. The other part of choosing a packable shoe is all about the comfort. On an adventure trip, it’s a safe bet you’re going to be doing a lot of walking. And sore feet at the end of the day can steal your enjoyment. Even worse, if that soreness carries over into the next morning — few things are more disheartening than starting out your day with achy feet. When Nora first switched to barefoot shoes, she worried about the impact on her legs and feet. As a dancer, she has a long history of shin splints, and she wondered if less cushioning in her shoes would lead to more problems. She says, “I thought I might suffer from a lot of foot fatigue walking around in a barefoot shoe all day, especially around town, but quite the opposite has been true for me.” If you’ve ever been on a vacation or adventure where sore feet were a problem, you know that all-day comfort can completely change your experience... for the better. And barefoot shoes could do that for you. One caveat: if you’re new to the barefoot experience, take some time to transition to wearing barefoot shoes before your trip. 2. A Packable Backpack Next on Nora’s list of essentials is a packable backpack. A packable backpack is a lightweight, but sturdy backpack that squashes down into something smaller than a loaf of bread... some versions can pack down to be smaller than your fist! These are perfect for day trips and side excursions. Instead of carrying your full backpack or hauling around your luggage, you can toss a water bottle, sunglasses, sunscreen, a jacket, and a few snacks into your packable backpack and have everything you need at hand with very little fuss. Or you can pack it down, tuck it into your coat pocket and whip it out at the grocery store to avoid using disposable bags. 3. A Packable Water Bottle Like traditional shoes, a typical water bottle has a rigid shape that takes up a lot of space in your pack. And while they may get lighter as you drink your water during the day, they don’t get any smaller. By the end of the day, they’re just taking up room. A packable water bottle is a different story. They’re usually made from food-grade, BPA-free silicone or thermoplastic polyurethane. These materials are tough, completely waterproof (obviously), lightweight, and flexible. The key feature? You can roll them up when they’re empty. As you drink water throughout the day, your water bottle takes up less and less space in your pack. And the water bottle itself weights next to nothing. Many versions are also built to stand up easily when full, so they function like a normal water bottle... just better. 4. A Packable Down Jacket Staying warm is part of staying comfortable. A down jacket made of lightweight materials can pack down to the size of a grapefruit (or smaller). But on cool days and chilly nights, you can just give it a shake to fluff it out, and then pull it on for a reliable layer of warmth. 5. A Packable Raincoat Like the down jacket a packable raincoat packs down small and weighs very little. But if it’s windy or rainy out, it can help keep you warm and dry. Better yet, for those really cold days, you can layer your rain jacket over your down jacket to stay extra toasty and dry. All told, these five items together won’t take up much more space in your pack or suitcase than a pair of rolled up jeans. And they’ll provide loads of comfort without adding bulk or weight to your luggage. Bonus Tips for Your Next Adventure Trip Beyond these five essentials, Nora provided three bonus tips to help you plan and pack for a big trip. Tip #1 – Pack for Multipurpose For each item you pack, try to think of at least two ways you’ll use it on your trip. If you need it for only one thing, make sure that thing is really important to you. Otherwise, consider finding a different option that will give you more versatility. For example, Nora’s Prios work for her on trails but also look at home in restaurants and museums. And her two jackets together work to create a system for staying warm and dry in a variety of circumstances. Tip #2 – “Just in Case Has No Place” Anything on your pack list that you’re taking just in case you need it is something you can leave behind. On most trips if a situation comes up where you need something you don’t have, you’ll be able to buy it. And if not, there’s a good chance you’ll discover you can do without it anyway. Adventure travel is far more enjoyable when you don’t have a lot of stuff to keep track of or haul around, so take a minimalist approach to your packing list (just like you do with your shoes!) Tip #3 – Pack Lighter On adventure trips, and even on more traditional trips, traveling lighter frees you to have more fun, to feel better, and to enjoy the experience more. Review your packing list with a very critical eye and look for ways to reduce your weight that won’t compromise your comfort. Because, ultimately, traveling lighter will mean a more comfortable trip... and a more comfortable trip is a more enjoyable one. About Nora Dunn: Nora Dunn* (aka The Professional Hobo), is one of the OG digital nomads, and has been a career traveler since 2006. She traveled full-time for 12 years, 2 of which she traveled with carry-on luggage only. For the last five years she has had a home base in Canada and she continues to travel most of each year, for up to seven months at a stretch (almost always with carry on only) *Nora Dunn is an affiliate of Xero Shoes.
How to Be Lighter on Your Feet While Running
Why You Want to “Run Lighter” Running lighter can have three significant effects on your running: Make running fun Become more efficient Help reduce injury risk How do you run lighter? It just takes a few minor form tweaks that you’ll discover below. Use Sound to Know How “Light” You’re Running The sound your feet make when they hit the ground tells you a lot about your running form. If you hear thuds or slapping noises, you’re “running heavy.” These sounds can indicate that you can improve your running form. Once you address your form, those sounds will not only go away, but you will improve your running efficiency. So, as you explore the tips, below, use the sound of your feet as feedback – your built-in coach. Tips for Running Lighter on Your Feet What changes to your form can help you run lighter? Here are the top tips runners use to improve their form and run lighter on their feet: Make sure your feet land under your body (avoid overstriding) You want to land forefoot or midfoot Let your heels touch the ground Place and lift your foot off the ground as you run Use cues to help avoid plopping your feet Keep your core engaged Pick up your cadence Run barefoot, or in minimalist shoes Let’s dive into each tip. 1) Make sure your feet land “under your body” Landing with your foot too far in front of your body means you’re overstriding. It’s like putting on the brakes each time your foot touches the ground. Why do runners need to overcome this habit? Research shows that overstriding increases forces that go into your joints (rather than letting your muscles, tendons, and ligaments mitigate force). And many researchers believe it's the leading contributing factor for getting injured. When you run, aim to have your feet land under your body, and not out in front. To get a feel for this, we suggest exaggerating this by putting your feet “behind you” when you land. Of course, you won’t actually be able to do this, but if you try, it will highlight what overstriding feels like. 2) Land forefoot or midfoot The type of footstrike is important for running lighter. Ideally, you want a forefoot or midfoot strike instead of a heel strike. When combined with landing under your body, landing mid- or fore-strike means you're using your legs as springs, starting feet first. If you land on your heel, you've lost the first spring in your leg. Do NOT reach out with your foot to land on your forefoot or midfoot - in fact, it’s the exact opposite of what you should be doing. Instead, land with your foot underneath your body (tip #1). When you do this, it's almost impossible not to land on your forefoot or midfoot. 3) Let your heels touch the ground If you're not used to landing on the ball of your foot, it CAN make your calves and Achilles work harder. Some people never let their heels touch the ground (even in shoes!), but there's no inherent benefit for doing that. In fact, if you don't let your heel come down as far as it feels right, you're not fully using your Achilles -- the best spring in your body -- to give you "free energy" when it un-stretches. Once you land on the ball/midfoot, you can let your heel drop if it feels better to do that. It will feel better or worse depending on whether you’re: Going uphill or downhill On a flat surface or an uneven one Moving faster or slower 4) Place and lift your foot off the ground as you run Many runners practically slam their foot onto the ground, especially if they’re overstriding. Instead, think about “placing” your foot on the ground, like how you would place a dish on a table… gently. If you land with your foot under your body (tip #1), and you land midfoot or forefoot (tip #2) this is much easier to do. In fact, it’s almost automatic. To get your foot off the ground, most runners PUSH their toes into the ground. Not surprisingly, this is called “toe-ing off”. And when you toe off, you’re using your calf more than necessary, wasting energy. Instead, think about lifting your foot off the ground by lifting your knee, or pulling your foot off the ground (both of which, technically, happen by flexing your hip). An image I like to use is stepping on a bee – you wouldn’t PUSH your foot to get off the bee, since that would drive the stinger further into your foot. You would reflexively use your hip flexor to LIFT your foot off the ground. Both “placing” and “lifting” can keep you light on your feet. 5) Use a cue to help you “un-plop” your feet This is actually similar to “placing” your foot but with a twist. Many people “plop” their feet on the ground and leave them there for too long. Ideally, to run lighter, you want your feet on the ground for as little time as possible. The actual amount of time your feet are on the ground will change based on your running speed, but this tip will help you find the ideal time, no matter your speed. Coaches use a few different cues to teach runners how to avoid plopping. It helps to pretend that… You’re running on hot coals or eggshells Your feet are wheels, and you want them to touch where the wheel meets the ground The ground is moving below you like a treadmill, and you want to move your feet at the same speed as the treadmill Think about lifting your feet off the ground before they even contact it Whichever analogy you choose, you must find your own way of meeting the ground lighter with your foot and keeping it on the ground for as little time as possible. Remember to listen to the sound you are making as your foot hits the ground and use that sound as a coach. 6) Keep your core engaged Core engagement is important for light running. But it’s not just having strong abs. When you run, think of your body as a spring. If you collapse in your midsection, you’re weakening the spring and making it less efficient and, therefore, making it harder to run. Keeping your core engaged while running is about maintaining a gentle but consistent engagement of your abdominal muscles. Imagine lightly drawing your belly button towards your spine in a gentle, controlled manner that doesn't hinder your breathing. This should feel natural and sustainable throughout your run. 7) Pick up your cadence Your running cadence refers to the total number of steps you take per minute. Most people think there is a target cadence of 180 strides per minute. Contrary to popular belief, there’s no optimal running cadence. Some successful runners do more, some do less. That said, most runners run with a cadence that’s too slow. Moving your feet faster gives you less time to keep your feet on the ground. That’ll help you learn to place/lift, “un-plop” and avoid overstriding while you run. So, on your next run, pick up the cadence just a bit without running faster. It’ll feel odd at first because you’re doing something different. But once you get used to that new cadence, try picking it up a BIT more. You’ll find a sweet spot that keeps you lighter on your feet without feeling awkward. And, yes, if you’re inspired to run with a metronome, it could help ;-) 8) Run barefoot, or in minimalist shoes Taking off your shoes and running barefoot can improve your technique. Of course, this isn’t always possible, so wearing a minimalist shoe can help. You don’t need to switch to a barefoot shoe, or barefoot running full time, but doing some barefoot running can highlight some form flaws that you would never notice in a “normal” shoe. In short, running barefoot with good form feels good, and bad form feels bad. If you just explore the tips above while running barefoot, you may find that last little “hitch in your giddyup”. If you want to run barefoot, use these tips: Run on a smooth, hard surface. This will give you the most feedback. A sidewalk or bike path is good. Grass is not great because it’s sort of like taking the padding from a shoe and covering the world with it. Plus, the ground is rarely even, and you can’t see things you might not want to step on… or in. Start SMALL. Let your first barefoot run be 20-30 seconds. Yes, SECONDS. Then, the next day, see how you feel. If you’re sore like you just went to the gym, that’s good. Rest and repeat until you enjoy those 20-30 seconds… then add 10 seconds every time you feel ready If barefoot isn’t for you here’s how barefoot shoes can help improve running form: Barefoot shoes have a wider toe box that allows toes to splay, and move naturally, which can improve posture and balance. Plus, it feels great to not have your toes all squished. Truly barefoot-style shoes have a non-elevated heel (a “zero-drop”) which naturally encourages runners to land more on their midfoot or forefoot rather than the heel. Normal shoes with a “drop” will shift your center of gravity forward, and adjusting to that can put strain on your back, knees, ankles, and hips. Minimalist and barefoot shoes are lightweight shoes that do not have unnecessary padding. They let you use your muscles, ligaments, and tendons as natural shock absorbers and springs (better than any man-made foam!) They mimic the feeling of running completely barefoot while giving you a layer of protection. Barefoot shoes don’t “support” your arch which, like supporting any joint, makes the surrounding tissues weaker. Research shows that merely walking in a barefoot shoe builds foot strength as much as doing a foot exercise program. So barefoot shoes let you build strength in your feet and legs naturally the more you wear them. When your feet and legs are stronger, you can run longer distances without feeling fatigued. Even if you run in “normal” shoes, barefoot shoes are great for active recovery and that strength-building I just mentioned. So slip them on once you’re done with your “normies.” The content of this post does not constitute and is not intended to be a substitute for professional medical advice, diagnosis or treatment. Always seek the advice of a physician or other qualified health provider with any questions or concerns you may have about your health or a medical condition.
How To Correct Slapping Sounds While Running Barefoot
Experienced barefoot runners find running barefoot light, easy, and fun. If you’re not experiencing the same thing, or if you have various issues like blisters or soreness… you’re doing something different than the people who aren’t having those problems. If you wonder, “What might they be doing differently? What could I change to make this light, easy, and fun?” then you’ll probably figure out the answer (probably without knowing exactly what you figured out!) and find yourself running in the same way. There are tips and ideas we can give you to help in that process, and that’s the point of this series. In this post, I want to talk specifically about barefoot running sandals. Barefoot running sandals, often called huaraches — the term that the Tarahumara use for the sandals they wear — can give you feedback that you don’t get from running barefoot. In other words, just having a little bit of rubber under your foot can give you additional information about your running that, when you attend to it, will improve your running… again, making it faster, easier, lighter and more fun. What’s the specific information I’m referring to? SOUND. When rubber meets the road — literally in this case — you hear something different than when skin meets the road. So, here’s something you should know: When you run in huaraches, you CAN run quietly… Sometimes even silently. That is, A SLAPPING NOISE IS NOT A FEATURE. It’s a pointer to something going on with your form that, once you address, will not only make the sound go away, but should improve your form. Sound is a cue. If you’re not running quietly, the question is: “Knowing that others run in sandals without making slapping noises, what could I do differently to get the same effect?” Slappy story #1 To help you find an answer, let me share a story I got from one Xero Shoes customer, Ron, who was hearing a slapping noise when he walked or ran. I give him my usual suggestions (which you’ll see below), and he called me back a day later. “I noticed something interesting,” Ron said, excited about his discovery. “When I ran up a hill (even a slight one), the noise went away! I’m doing something different with my feet when I go uphill.” “PERFECT!” I responded. “So, the next time you go out for a run, wonder what might be different about your gait when you’re going uphill, and see if you can get that same thing to happen on a flat.” Ron called back the next day even more excited. “I figured it out! I can run quietly now!” I asked what he discovered and, happily, it was everything I recommend to people in this situation: When he went uphill, he put his foot UNDER his body more, rather than reaching out with his foot at all Went he went uphill, he placed his foot on the ground so that it “met the ground”, rather than dropping it onto the ground When he placed his foot, he landed with more of a midfoot strike, almost flat-footed. He didn’t try to land on his foot, but to have his foot moving when it contacted the ground. His “spring” was softer — that is, he flexed his ankle, knee and hip more when he was going uphill, instead of landing with a rigid spring. Here’s the fun part: After noticing these things, Ron didn’t consciously do anything different when he got onto flat surfaces… but the sound had gone away. His body/mind figured out the solution for him. A second slappy story Now, some people need to be a bit more deliberate, and experiment with different ways of moving, but often just wondering and noticing is enough to create change. Here’s another story that highlights the same thing: Jason (definitely not his real name) came to the office to get a pair of Custom-Made Xero Shoes. He told me that he’d been running barefoot for 15-20 miles/week for the last 5 years. “Every now and then, though,” he confessed, “I get some pain in the top of my foot or in the bones near my forefoot.” “Oh,” I said, somewhat offhandedly as I made his shoes, “You overstride.” “No, I’ve been doing this for a long time. I have good form.” “I hear you,” I replied, “but I’m willing to bet you overstride, that with the idea you should land on your forefoot, you’re reaching out with your foot. In fact, I’m willing to bet that as soon as you put these sandals on, you’ll discover the same thing.” “How’s that?” he asked. “You’ll hear a slapping noise when your foot hits the ground.” Sure enough, he put on his shoes and we went for a run and with every one of his steps, you heard “Slap Slap Slap Slap.” He was shocked, but I wasn’t. It’s not uncommon that barefoot runners have some form problems that they don’t notice… just like any runner. In this case the sandals pointed out the problem. “Hey!” Jason said, looking at me as we ran together, “You’re not making any noise.” We stopped and I gave him the cues that I’m about to tell you. Within 5 minutes, his running was totally quiet. But there was another benefit. Looking almost confused, Jason said, “This feels totally different than what I’ve been doing for the last five years!” “How so?” “Easier, lighter, stronger… like I could keep going forever!” BINGO! Me, me, me, me, me I know that the stories above suggest that all slapping noises are caused by form. And, frankly, that’s true 99% of the time. The other 1% is if your sandals are tied WAY too loosely. When you tie Xero Shoes, they should be comfortable. Definitely not tight. And while it’s true that if they’re way too loose, that could increase the chance of making slapping noises, if you walk or run with really good form, even having your sandals practically falling off your feet won’t cause noise. But, if your form isn’t perfect yet, then you may want to try tightening the lace a bit (again, if they feel too tight when you do that, you’ve gone too far). So, assuming too-looseness isn’t the issue… De-slapping So, here are the recommendations for “de-slapping” your running: Simply wonder, “What could people who run quietly be doing that I’m not?” and then experiment with your gait Feet under you — Rather than overstriding, don’t reach out with your foot. Place your foot closer to “under” your body. Exaggerate this for a while if you want to, as if you could place your foot behind you when you land Be soft — think of your lower body as a spring… from the foot, through the ankle, through the knee, into the hip. Catch the ground — rather than “landing” on your foot, imagine that the ground is a treadmill, and you have to “catch” the moving ground under you with a moving foot. So your foot contacts the ground as it’s already moving Try new foot placements — some people land on the ball of their feet. Others land midfoot. Some land flat-footed. Experiment and see which feels right for you. Notice, by the way, that how you land may change depending on whether you’re going up or down hill, accelerating or decelerating. Run uphill — feeling the difference as you run uphill may, like Ron, help you discover how to run quietly Here’s my favorite tip, though: MAKE NOISE! — one way to stop making noise is to deliberately make noise so you understand where the noise comes from. You want to prove to yourself that overstriding causes slapping? Simply run fast and then try to stop quickly — to stop quickly you have to overstride. I bet you hear slapping noises. Want to prove that a “tight spring” could make noise? Pretend you have no knees for a few strides and see what happens when you land almost straight-legged. Get the idea? Let me know what you discover in the comments below.
Foot Recovery Tips from a Functional Podiatrist
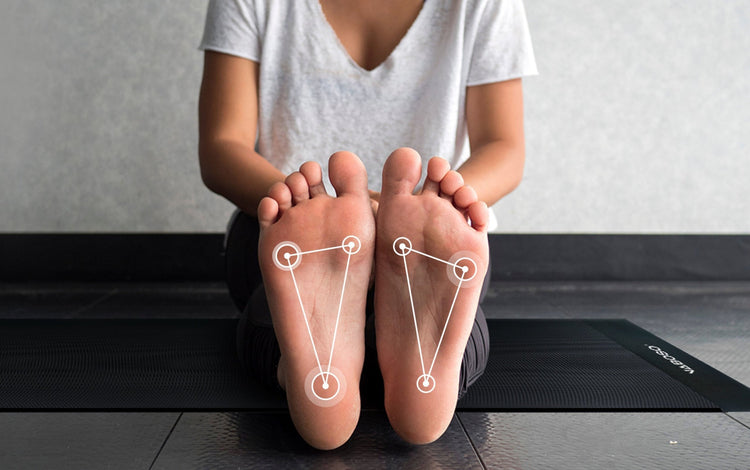
Dr Emily Splichal - Xero Shoes Partner Our feet carry us through life, supporting our weight and keeping us on the move. They carry us through our day to day, but we often don’t appreciate them until they start to ache or become injured. Research suggests that up to 87% of people will experience foot pain at some point in their lives. This number is so high not only due to the amount of repetitive stress our feet encounter on a daily basis. From overly supportive shoes to a gradual weakening of the foot with age, we need to be proactive in our foot health to prevent this high risk of foot injury. As a functional podiatrist, I strongly believe in the power of daily foot recovery, foot strengthening exercises and smart footwear choices to offset daily repetitive foot stress and to make a lasting impact on foot health and movement longevity. In this blog, we will explore an example of a daily routine to help you take steps towards improved foot health. Morning As you wake up each morning, this is the perfect time to also wake up your feet and align your foot posture, allowing you to better react and respond to each step throughout the day.First, start each day by releasing your feet for just a couple minutes with the Naboso Neuro Ball. This innovative product is unlike any foot release tool in that it is not only a ball but it also splits open to make two domes. In addition, both domes are covered with a patented texture which uniquely stimulates the nerves in the bottom of the feet. To begin, follow this simple 5 point foot release where you stand on specific points on the bottom of your foot for 30 seconds - allowing for pin point acupressure stimulation along the muscles of the feet. After releasing the feet, I like to go directly into an exercise called forward lean. This is a foot posture activation exercise that takes less than 30 seconds to do. Start by standing with the feet shoulder width apart and find the foot tripod under the 1st metatarsal head, 5th metatarsal head and heel. Lift the toes, spread that out as wide as you can, then place them back down onto the floor. Slightly lift the arch of the foot by rotating externally in the hips. Now that your base is stable, stand tall with your arms by your side. Imagine you are stiff as a board. Staying stiff as a board, slightly lean the body forward until you feel the toes push down into the ground. Return to the starting position and relax the feet. Repeat 5 times to sufficiently wake up the foot muscles for your day. During the Day In an ideal world, work would do itself and we would be able to just live our lives as our feet take care of themselves. While this isn’t fully possible, there are tools that make it almost that easy! Stay connected to your feet with no effort at all by wearing minimal footwear and sensory-stimulating insoles or socks. Evidence suggests that our foot muscles respond to sensory stimulation, so by reducing cushion in our shoes it could help strengthen our feet and support our body alignment. A combination of Xero Shoes plus the Naboso Activation insoles creates an environment of maximum sensory stimulation and therefore could help support overall foot health. Evening At the end of a long day, we all just want to kick our feet up and relax. However, just taking pressure off of our feet may not be enough to fully recover the 26 muscles in the bottom of our feet. A great way to passively restore your foot shape and stretch your toes is toe spacers. Toe spacers such as Splay by Naboso, gently realign the toes to their natural position, improving foot function and minimizing arch pain. Whether you want to wear toe spacers while relaxing on the couch or walking around your home, toe spacers are fast becoming one of the fastest-growing foot recovery trends as featured in a recent Wall Street Journal article. To learn more, you can watch a recent lecture I gave about the science of toe spacers. Conclusion There are many options available to help boost your foot recovery and offset foot pain. Remember, the more consistent you can be in your daily foot habits the better the results you will see! By starting with these tools and exercises, you’ll be fast on your way to the results you want. About the Author/Bio: Dr Emily Splichal, Functional Podiatrist and Human Movement Specialist, is the Founder of EBFA Global, Author of Barefoot Strong and CEO/Founder of Naboso Technology. With over 23 years in the fitness industry, Dr Splichal has dedicated her medical career towards studying postural alignment and human movement as it relates to barefoot science, foot to core integration and sensory integration.

A Podiatrist Explains How Shoes Impact Your Foot Health
Massachusetts-based podiatrist Dr. Alissa Kuizinas (and Xero Shoes partner) has more than a medical perspective on footwear. She struggled with foot discomfort for years. With each step she took, her big toe would jam against the inside of her shoes – “even with my ‘good shoes’ on,” she recalls. The $133 billion shoe industry has footwear specialized for every situation. Workout shoes. Hiking boots. Running shoes. Even walking shoes. And the solution to foot problems? The typical suggestion is more cushion, more support, and a more rigid structure to immobilize your foot. But is that the right approach to shoes? Your Foot Issues Might Be a Shoe Problem “Traditional medicine would recommend that I wear custom orthotics, limit my activity and wear stiff-soled shoes until the pain becomes bad enough to require surgery,” Dr. Kuizinas says. “I knew there had to be a better solution.” The deeper this foot doctor delved, the more she found that her feet weren’t the problem. It was her shoes! “Even though shoe companies spend millions of dollars on technology and design development, the shoes they produce and sell are doing a major disservice to human feet,” she explains. “From cushioning to heel-toe drops, stiff soles to narrow toe boxes, nearly every aspect of a modern shoe has a negative impact on foot movement. It leads to an epidemic of dysfunctional, weak, and malfunctioning feet. And most of us aren’t even aware this is happening!” Get Out of the Way of Your Feet “The primary purpose of shoes is to protect our feet from the elements and from different surfaces,” Dr. Kuizinas says. “They’re for when we are out in the world walking on a slippery or wet surface. Ultimately, shoes are really there JUST for that purpose. They don’t need to be bulky and restrictive, or supporting our feet. Our feet are designed to support themselves!” Think of any muscle in your body. If you use it, work it, and challenge it, what happens? It gets stronger. And if you don’t use it, or even worse, immobilize it, it gets weaker. The same is true of the muscles in your feet. Your Feet Are Made to Be Strong Your feet are made to support the entire weight of your body. They’re meant to be strong. For them to maintain that strength, they need to work. And that means your shoes shouldn’t be doing their work for them. So… why not just walk barefoot all the time? Research supports the idea of slight “protection” being beneficial. A study comparing outdoor barefoot walking with minimalist footwear found that the shoes improved walking form in both younger and older adults, and reduced risk of falling. Dr. Kuizinas recommends a ‘as little shoe as possible’ approach to footwear, putting the focus on building resilient, capable feet.“Rather than building up the shoe to try to externally support the foot and limit motion, minimalist shoes get out of the way of our feet,” she says. “They allow feet to function naturally, to move and bend. The transition to minimalist shoes involves stripping down the unnecessary and harmful components of modern shoes so that feet can be feet again!” When working with clients today, Dr. Kuizinas shies away from the term “minimalist shoes.” Instead, she likes to talk about “functional shoes” or “natural shoes.” “Natural footwear is really on the leading edge of shoe technology,” she says. “By stripping away the unnecessary and downright harmful features of shoes, we allow feet to function effortlessly as they were designed to!” And when we do that, we give our feet the chance to grow strong and capable... the core of good foot health. How to Find a “Functional” Shoe that Supports Good Foot Health Dr. Kuizinas has a three-point checklist of what she looks for in a functional shoe, which not-so-coincidentally match up with the three major functions of the human foot during walking. “The foot has three jobs: to be a ‘mobile adaptor’ or shock absorber when it first hits the ground, to be a rigid lever during push-off, and to be a sensor of the environment,” she explains. “As long as it can do these three things, it will function well.”Here’s how she says those functions should be reflected in the shoes you wear: Wide Toe Box: “Functional sneakers should have a wide, foot-shaped toe box. They’re broad enough to allow our big toe to sit in a proper alignment.” Flat & Flexible Soles: “Our feet contain 26 bones and 33 joints. And joints are designed to move! A flexible sole allows for natural foot movement. By contrast, stiff and rigid shoes with elevated heels prevent the joints from fully moving through their range of motion and limit the foot.” Minimal cushion and support: “A functional shoe should be only as cushioned as you really need. Overly cushioned shoes dampen your perception of what’s going on with your feet, and your ability to walk well.” If you follow these simple standards, you’ll find shoes that support your foot health by not doing so much to support your feet! Be Patient and Build Up to Barefoot Both from her personal experience and in her professional practice, Dr. Kuizinas recommends being patient when it comes to transitioning to full-time “functional” footwear. In the early days, she recommended a one-two approach of wearing functional shoes primarily for low-impact activities like walking and running errands, while also going barefoot around the house to help build resilience in the feet and ankles. “As your foot function improves, you’ll be able to tolerate less arch supportive shoes for greater amounts of time,” she explains.In not too much time, you’ll find yourself able to enjoy walking, running, hiking, and anything else you love to do more... because you’ll feel steadier and more stable on your feet. Click Here to Find the Best Barefoot Shoe For You.
3 Reasons to Try Barefoot Hiking Boots
@danisflowing lays out for us three facts about barefoot shoes that'll knock your socks off (literally).Who knew going barefoot could be this game-changing?"If I could go back in time, I would get myself a pair of barefoot shoes sooner.""The roomy toe box and minimal design of barefoot footwear aim to replicate the natural movement of walking barefoot while still providing some protection. And honestly, they are so much comfier than traditional narrow shoes!"Try the RidgewayCombine the allure of retro style with cutting-edge barefoot-friendly technology, and you get the Ridgeway – a hiking boot with a rugged canvas upper with suede accents.It’s ready to conquer technical trails with friends and comfortable enough to enjoy a beer afterward.
Popular Reads